• Paintings of people---
  • Paintings of People 2 ---
  • still lifes---
  • Landscapes---
  • Pets and Animals---
  • Drawings and Misc.---
  • Craftsman Stuff and Cool Stuff---
  • Sculptures---
  • About Me, Part One---
  • About Me, Part Two---
Menu

Ron Maki

Ron Maki
Artist Craftsman Maker
  • Paintings of people---
  • Paintings of People 2 ---
  • still lifes---
  • Landscapes---
  • Pets and Animals---
  • Drawings and Misc.---
  • Craftsman Stuff and Cool Stuff---
  • Sculptures---
  • About Me, Part One---
  • About Me, Part Two---

Click here for intro to Cool Stuff..and a list of projects I've worked on!

This is a pic of my son Jeff when he was about eight years old playing a dulcimer I made about 1990.

I've always created, made, fixed and restored things my whole life. It's not only fun for me, but extremely satisfying to make or repair things.  I guess it's an instant feeling of accomplishment.  The machine or mechanism either works or it doesn't, there's no gray area.  My Dad and my Grandfathers were all an inspiration to me.  They could make anything - it seemed to me when I was a little kid.  They grew up on farms, far away from bigger towns.  So, I suppose, it was necessary to be self sufficient.  And they were. They were craftsmen and makers and took pride in their work.

 Some of the stuff I've enjoyed working on:  

 -Repairing and restoring antique, and newer, musical instruments (banjos, electric and acoustic guitars, ukuleles and dulcimers)  -- antique furniture --  old toys -- antique clocks -- motorcycles ( I owned about a dozen at various times) -- cars and trucks -- old RV trailers --  fences and gates made from scratch -- pretty much any type of carpentry work -- antique typewriters -- old cast iron and metal wood burning stoves -- bookcases -- tables -- Shaker inspired furniture -- linoleum and wood block prints -- old letterpress printing machines  (they were especially fun, made from cast iron, and made to last forever, with a little tender loving care). -- cast iron book presses -- -- plein air pochade boxes --  jewelry -- knives -- old guns -- any type of mechanical gizmo or "meckagism" LOL,  (I had to know how it worked, even today I take things apart to see how it's made before I'll get rid of any type of gizmo) --  and tons of STUFF (literally) that I've forgotten about.  I've worked on it all, and it was a blast. (mostly!). Check out the "1969 RV Trailer," that was a fun one!


WP_20180111_20_15_32_Pro.JPG

Guitar stand

Guitar stand. December 2021, made entirely with parts from my workshop. Zero dollars spent. I needed a better way to organize some of my guitars so I made this stand from junk I had lying around. It came out great.

IMG_5792.jpg
IMG_5789.jpg
IMG_5790.jpg
IMG_5783.jpg

Cutting a canoe in half

August 2018

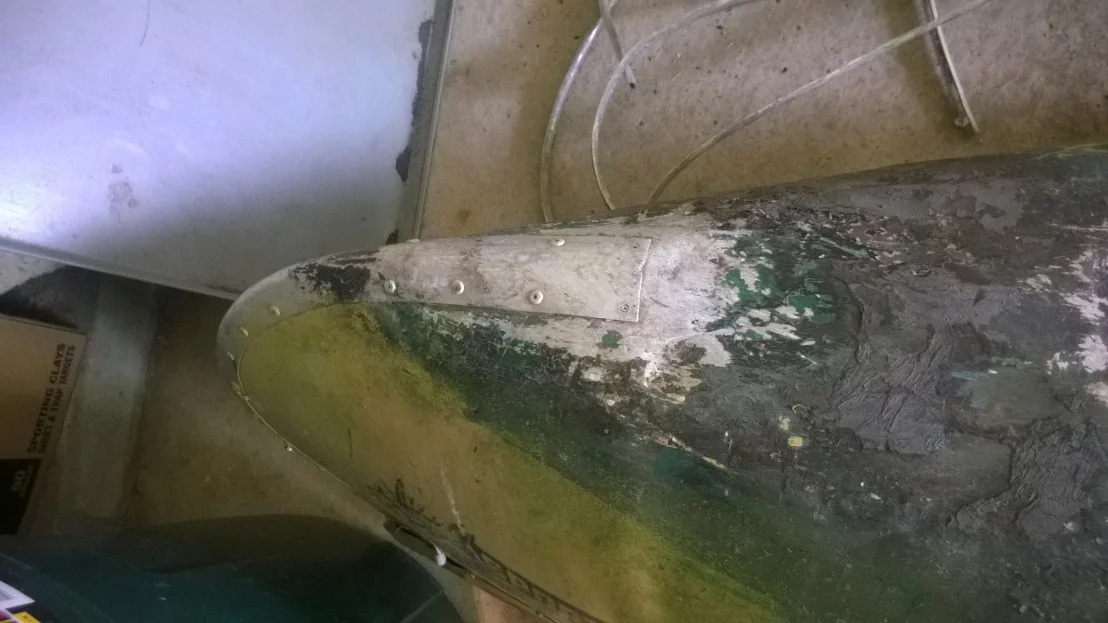
My summer project. First priority — Low Budget. Second priority— light weight and small. I bought a really beat up 1975 Sportspal 14 foot canoe for $40. The guy wanted $260. It had fiberglass patches, aluminum patches, “goop” patches. The bottom was all hoopty-doo and crooked. The foam liner inside was all rotted away. The aluminum ribs were bent in a lot of spots. Etc. etc. Look at the pics. He said it didn’t leak, I showed him at least 6 spots where it leaked like a sieve, he took $40 bucks. The worst, and unexpected part, was when I took the liner out and the fiberglass off, there was a huge 2 foot gash in the bottom. (see pic). It had been patched a long time ago and now had reopened. I could have fixed it, but considering all the other holes and problems on one end of it, I decided to cut it in half, or, more precisely one-third. So I did. It wasn’t that hard using a hack saw and tin snips.

Then I made a cardboard template for a transom. Then made one out of clear pine. Attached it with lots of stainless steel screws and Flex Seal, and double sided Externabond tape. (Which I had a lot of the tape left over from my old RV project a few years back). Then I folded part of the bottom and sides that I left long over the back of the transom. More screws and liquid Flex Seal from a can. It didn’t have a keel so I made an internal one out of 1/8 by 2 1/2 aluminum strip right down the middle of the inside, just to stiffen it up. Double sided Externabond tape to hold it to the hull, and then 4 inch wide white Externabond tape on top of that. A new liner costs $100 from the factory so I went to a local foam store and got the exact same stuff for $17. I cut the new liner using the old one for a template and installed the ribs. Some of them cracked in half so I splinted them with aluminum tubing underneath. (they are hollow hemispheres on the bottom side.) I used stainless steel lock wire to wrap them and hold them in place, then gooped them with clear epoxy.

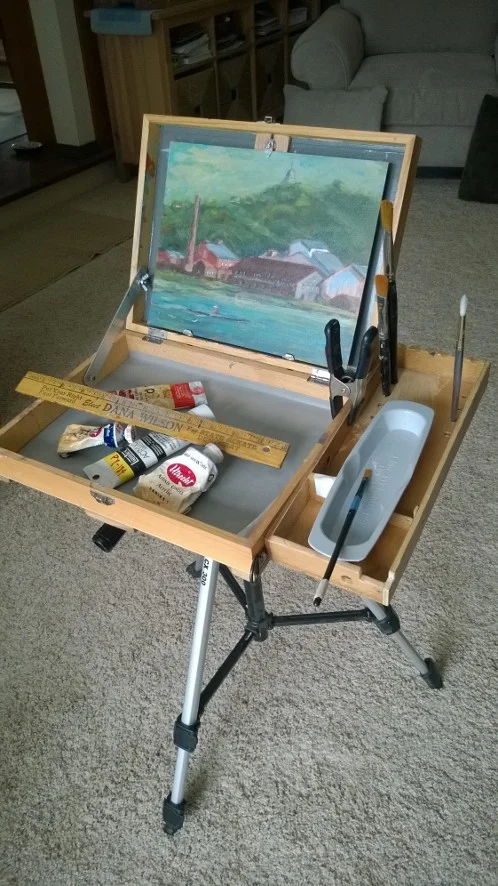
Then I painted the bottom with house paint primer and put some flex seal goop on the worst part. Then I painted the birch bark color and pattern with acrylic artist paint, mixing up most of my tubes of various yellows with a bit of burnt sienna.

I put block foam, that I got in the UP of Michigan for free, in the bow to make it unsinkable. I did not install the usual sponsons on the sides of the Sportspal. I painted the name on the transom “2/3” and its subname “CA-RO-KA”, canoe, rowboat, kayak.

I also made an easily removable set of wheels to clip to the transom so that I could move it even easier than carrying it. I used part of an old RV ladder and some wheels off an old lawnmower. I would have to flip it over so the bottom is up to use those, so I also made another set of wheels from the small dolly in our garage we use for moving the trashcans out. That set of wheels attaches simply to the bottom of the boat so that I can move it right side up. Without altering the dolly.

Then I will store it in the garage from the ceiling. So rather than lifting it to a bracket or whatever I am making a pulley system with the block and tackle from my Grandpa’s barn in Elo Michigan. I will be able to set it on the floor, put straps around the bottom, and hoist it up with tackle that gives me 3 times mechanical advantage ( 2 pulleys, one with 2 rollers and one with one roller). So the 47 pounds will hoist up feeling like it’s only a 16 pounds canoe. Boom !!! —- the physics of simple machines!

I’ll probably paddle it with a kayak paddle, but will also make oarlocks and make my kayak paddle into quick change oars. My total cost for this project, using a lot of stuff and junk metal I already had, was about $160. Probably about 60 hours of work, lots of creativity and problem solving, which makes the project exciting to me, with all the large and small leaks and other problems.

Total length 8’ 10” Width 37 “ Weight @ 47 pounds.

I’ll put pics of its maiden voyage on this site when that happens. Soon I hope!

8-26-18 Had it out on Walters Lake in Clarkston, (The big machines around me are lake weed whacking machines). It doesn’t leak! It floats well. I paddled it with a kayak paddle, changed the paddle into a canoe paddle, and changed that into a set of oars, with some temporary oar locks I made. (You can see them in the pic of me in the boat). It rows great. But paddling it was a different story. It has a tendency to swing back and forth because it doesn’t have a keel.

When I got it home I made a removable, kick-up, skeg that attaches over the transom. It’s like a rudder that doesn’t move sideways. That should make it track straight.

Also I didn’t have a seat in it and realized I need one right where the crossbar is. I removed the crossbar and built a seat that can slide backward or forward on the gunnels, and is also removable.

Seat and skeg made from metal and junk I had lying around. Zero cost.

Hopefully I’ll get out to test my seat and skeg before winter sets in!

Tested the skeg and slidable seat!! Perfect! See pics…

WP_20180720_12_10_46_Pro.JPG
WP_20180715_19_53_17_Pro.JPG
WP_20180717_12_10_30_Pro.JPG
WP_20180720_12_22_13_Pro.JPG
WP_20180727_11_46_01_Pro.JPG
WP_20180720_12_24_45_Pro.JPG
WP_20180722_15_09_46_Pro.JPG
WP_20180726_15_43_24_Pro.JPG
WP_20180823_15_27_33_Pro.JPG
WP_20180715_19_53_06_Pro.JPG
WP_20180726_19_51_15_Pro.JPG
WP_20180717_12_10_39_Pro.JPG
WP_20180810_12_59_35_Pro.JPG
WP_20180728_13_02_38_Pro.JPG
WP_20180823_15_23_48_Pro.JPG
WP_20180823_15_59_09_Pro.JPG
WP_20180824_11_55_20_Pro.JPG
WP_20180824_11_55_43_Pro.JPG
WP_20180824_10_59_49_Pro.JPG
WP_20180824_18_59_14_Pro.JPG
WP_20180824_18_57_05_Pro.JPG
WP_20180824_19_38_36_Pro.JPG
WP_20180826_13_02_58_Pro.JPG
WP_20180826_13_03_10_Pro.JPG
WP_20180901_17_03_42_Pro.JPG
WP_20180901_17_04_59_Pro.JPG
WP_20180901_17_04_13_Pro.JPG
WP_20180906_14_46_52_Pro.JPG
WP_20180906_14_47_21_Pro.JPG
WP_20180906_14_47_35_Pro.JPG
WP_20180906_14_47_47_Pro.JPG
WP_20180906_14_47_26_Pro.JPG
WP_20180906_14_47_00_Pro.JPG
WP_20180915_16_19_26_Pro.JPG
WP_20180915_16_21_45_Pro.JPG

*E. Sicardi, old mandolin restoration

May - June 2019

This is a vintage Italian mandolin made approximately 150 years ago. It was made by E. Sicardi in Naples Italy. Inside the body is a paper label that says, “E. Sicardi, Napoli, Fabricanti di Instrumenti Armonica” I cannot find any information about this maker. So if you have any info about him please send me an email at ronmaki99@gmail.com. In all the extensive research I did on this mando all I have is speculation. I believe he is somehow connected to the very finest mandolin makers in Naples in the 1800’s, the Vinaccia family. I base that on the similarity of this mando to the ones they made. Especially the shapes of the dark wood designs on the soundboard, etc. Check them out on Google and on the “Met”, (Metropolitan Museum of Art), website on vintage mandolins.

I restored this as a commission for my good friends Bill and Carolyn, it was previously owned by a distant relative of Carolyn’s. The headstock was broken off, there was a big gash in the body, it had two large cracks in the European spruce top. And the body panels on the back were starting to separate. along with other minor problems like a dried out fretboard. I also made a case for it from scrap wood and parts that I had in my workshop. (Such a beautiful instrument should be protected. ) I strengthened the neck joint at the headstock by adding two reinforcing plates. One on top and one underneath. (see photos). The top one is made from a nickel silver spoon approx. 150 years old from my Grandfather’s farm. And the bottom brass plate is made from a 30.06 rifle shell. The brass looked old enough to belong on the mando, plus, it’s super strong brass. I tried to keep the mando as authentic as possible.

It was a great project for me. It took about two months. I did a lot of research on repairing before I even did anything. I’ve never restored a mandolin, but I am very happy with the results.

I now can add mandolins to the list of stringed instruments that I’ve restored — along with banjos, dulcimers, acoustic guitars, electric guitars, metal bodied guitars, and ukuleles. (Looking for a stray and homeless violin???!!!)

FullSizeR.jpg
IMG_1088.jpg
IMG_0914.jpg
IMG_0659.JPG
IMG_0921 2.jpg
IMG_0658.JPG
IMG_0660.jpg
IMG_0918.jpg
IMG_0995.jpg
IMG_0996.jpg
IMG_1001.jpg
IMG_1020.jpg
IMG_0994.jpg
IMG_1005.jpg
IMG_0991.jpg
IMG_1004.jpg

4 string guitars

This is my latest project. I’m making 4 string guitars out of 6 string junker guitars. See all 7 pics I’ve included. It’s extremely simple. Take off all the strings. Set aside the 2 bass strings, (the 2 thickest). Or better yet get a new set of acoustic Light Gauge strings. .012 to .053. set aside the 2 bass strings. On the nut (near the tuners) file, with jewelers files, 2 new slots. You want the strings evenly spaced. See the pics. Use the 2 outside slots as they are. And , carefully measure, or use a good eye, to evenly space the new middle 2 slots for the middle 2 strings. Now install the strings using the MIDDLE 4 holes on the bridge as they are. See pics. Now you should have 4 nicely spaced strings with a lot more room for your fingertips to form chords on the fretboard! Tune the stings to Ukulele tuning GCEA, don’t use the high G like the Uke does , (or the string will break) but use the lower octave G. You can find thousands of songs with words and chords on the internet. The best site by far is UKUTABS.COM it has the chords pictured right on the lyric page, also how to form the chords. Another good site is www.scorpex.net/uke. It is so easy to play the 4 string guitar it’s not even funny. I’ve played guitar, slide guitar, banjo, ukulele, and dulcimer and I’ve never had so much relaxing fun as playing all kinds of songs on the 4 string guitar.

By the way Ukulele tuning is the same as the tuning on a normal guitar at the fifth fret!

Something I learned by accident is that you can still play a normal 6 string guitar, using only the 4 treble stings, using the uke chords! Also, you could — tune the 2 bass strings to G and C — tune the other 4 to uke tuning, thus making the 6 string guitar have a tuning of GCGCEA. Play the uke tuned guitar using the 2 bass strings as drones. Kinda like a Dulcimer. Finger picking is a blast doing all this stuff.

Also, by the way, these 3 guitars in the first picture were all junkers. Most people would of scrapped them. They were all unplayable. All the other pics are of the guitar on the left. A beautiful German classical guitar, made in 1966, that someone had put steel strings on and ruined it. Naturally the top was bowed so bad it was unplayable. I cut the back off with a jigsaw. steamed the top and put about 60 pounds of weight on it to flatten it back out. I added some bracing inside (way too thick, I KNOW!) But it worked, I put it back together but the neck was also warped up. So I cut a 2 or 3 degree notch on the bottom of the heel where it meets the body all the way up to the fretboard, but not through the fretboard, so that I could change the angle of the fretboard. Glued and screwed it into its new angle, and this brought it level with the newly straightened top. It has a beautiful soft sound. It has a gorgeous European spruce top!

The other 2 guitars also needed work, one is a Korean Lotus guitar from the 1960’s made with wonderful material. A very close grain solid spruce top with rosewood neck and sides. A guitar with these materials today would cost over a thousand bucks. I got it in a thrift store for $15. All I had to do was adjust the neck. It had a great adjustable truss rod. And I had to repair the bridge, it was pulling away from the body and had a slight bulge in the top that I repaired with a small brace inside and bolts holding the bridge on. Crude, but works like a charm! It is a full sized guitar with the most amazing mellow, thousand dollar, sweet sound.

The third guitar, the one in the middle is a mediocre guitar to start with, it had a warped neck, no adjustable truss rod. So I had to take a couple of degrees off the heel of the neck on that one too. It also had a warped top that needed inner bracing that I installed through the sound hole. It has a spruce plywood top. It’s a good beater guitar I’ll probably bring on fishing trips. It’s got a fair sound.

FullSizeR 5.jpg
FullSizeR 7.jpg
FullSizeR 4.jpg
FullSizeR 6.jpg
FullSizeR 8.jpg
FullSizeR 2.jpg
FullSizeR 3.jpg

* Banjo, 1905 Lyon and Healy

This is a 1905 Lyon and Healy 5 string banjo I found in deplorable condition at an antique show.  I had to buy it , it was so cool.  I fully restored it over a period of many months and then decided that I had to learn to play it.  So I found a teacher  and he taught me to play.  That started my continuing interest in restoring old musical instruments.  

One "before" pic, and 2 "after" pics.

WP_20180111_20_14_51_Pro 2.JPG

Homemade Resonator Guitar

I made this resonator guitar in the summer of 2020 from an old junker, No Name, guitar I had. (Shown next to my brand new Gretsch G9200 Boxcar, which has an AMAZING sound) I got the parts from the internet about $60. Cut the hole, made an inside rim of plywood that the aluminum resonator cone could sit on. Glued that plywood in. Made a metal resonator for inside the body from an old cake pan. ( which didn’t have that great metallic sound so I took that out and replaced it with the stainless steel, very thin and stiff, side of an old Cuisinart coffee maker, that I had scrapped out years ago—-good metal is hard to find—- great sound! with the stainless steel in it). I also had to change the angle of the neck by cutting out a 2 or 3 degree -cake slice- like piece off the heel of the neck, without cutting through the fretboard. It sounds great! now I have 2 resonators ( way way back I had 3 metal body resonators). Anyway this one that I made I tune to Open D ( think of Ry Cooder sound) and the new Gretsch in the first pic I tune to Open G (think of the early Blues guys like Son House and Robert Johnson, and of Keith Richards, and all the GREAT Stones songs). BOOM! absolutely nothing beats the sound of a resonator guitar!!!

IMG_3381.jpg
IMG_3344.jpg
IMG_3340.jpg
IMG_3375.jpg
IMG_3349.jpg
IMG_3433.jpg
IMG_3679.jpg
IMG_3682.jpg
IMG_3359.jpg

Goya guitar, repair

I found this old Goya guitar (circa 1971, model number GG163, serial number 53698, solid spruce top! , birch back?) in an antique shop up in Hancock Michigan. The neck was broken right off, it stunk severely of cigarette smoke, but everything else was in fair shape. It was a fairly simple glue-the-neck-back-on repair, everything took less than an hour. Including an intense cleaning. I also made a small neck angle adjustment. And string height at the bridge adjustment. It has these, cool, I’ve never seen before, string height adjusters on it. You lift the string and screw in-or-out the 3/4 inch long plastic screws. At first I thought it was a crap system. But it works great. You could replace them with metal screws made from bolts with the head cut off and a ridge filed on top. They are fine thread. Anyways it’s a great sounding guitar as a 6 string, but I changed it into my 4 string, — version of Ukulele tuning A D F# B, —fun to play guitar. CHEAP THRILLS!!!

IMG_3326.jpg
IMG_3249.jpg
IMG_3254.jpg
IMG_3255.jpg

* Guitar, 1935 ? National Duolian

The first pic is of the restored guitar, the second is how it looked when I got it.  This is a 1935 National Duolian steel bodied resonator guitar, originally geyish paint. (serial number A-229 , 14 fret, solid head, square neck (that I rounded out a little) that I found at a guitar show.  It was in pretty bad shape needing a new resonator and some TLC.  I restored it then felt I needed to learn to play Blues slide guitar.  So I did.  This thing had an amazing sound and got me into a years long study of the Delta Blues, slide guitar, making various slides, from bottlenecks, copper pipe, tractor bearings, a piston wrist pin from an L-88 Corvette race car, and other various "tubular" gizmos.

The third photo is of the three metal bodied guitars I owned at one time. The first one is a modern day National, the second is a modern day Dobro, the third is the 1928 National I restored. 

Eventually I sold the guitar at a great profit....but it's one I should have kept,  I'll probably never come across another for a decent price.

WP_20180809_17_39_10_Pro.JPG
WP_20180111_20_02_49_Pro.JPG
WP_20180111_20_02_20_Pro.JPG

* Guitar, 1930's Oahu guitar

I can't remember where I got this guitar but it was ready for the junk heap when I bought it.  I found out later it's from the 1930's, and I had never heard of the Oahu brand.  I restored it and played it for a few years then donated it to my son's school for a fundraiser. A really nice smaller size guitar.

WP_20180111_20_03_26_Pro.JPG

Instruments I've worked on

These are some of the instruments I worked on probably in the late 1980’s. The dulcimer I made myself, from a kit that just gave you the wood pieces and I had to do the rest. The electric guitars I liked changing the electronics around so they had more options for different sounds with the switching systems etc.

The acoustic guitar hanging just to the right of my head was a junker that was unplayable. I made it into my first slide guitar, the action was so high, and the top was so buckled that it wouldn’t work as anything else. But it’s the one I learned to play slide and blues on! (Notice the “Resophonic” buttons on the soundboard, they actually helped hold the top in a more correct position. LOL.)

IMG_1108.jpg
IMG_1107.jpg

Fender Strat and Gibson Les Paul

Here’s 2 more guitars I worked on, way back. The only 2 electric guitars I ever owned. I swapped the pickups between both of them. I put the hum buckers on the strat and the single coils on the Les Paul !!! Got the idea from a magazine article see the photo of it here.

IMG_6651.jpeg
IMG_6653.jpeg
IMG_6646.jpeg
IMG_6647.jpeg

* Pool Deck and Surrounding Fence

Pool deck, with stairs and surrounding fence.  Built around 1990.  This was a major project.  A couple weeks of work to do by myself.  The hard part was digging 24 postholes each over 3 feet deep.  I rented a one man,  gas engined, post hole digger that almost broke my arms when I hit a big chunk of something about two feet down.  I dug around it by hand enough to know that it was the hood of a Cadillac automobile!  For all I know Jimmy Hoffa is down there!

WP_20180111_20_12_28_Pro.JPG

Ukelele, Kay 1961

This was a fun project.  I found this uke in a junk shop up in Houghton Michigan in the U.P. around 2008.  The back was split open and the top was peeling off and the finish on it was bad.  It's a soprano uke, which is the smallest uke they make, so it is tricky to fret it when playing.  But you do get used to it after a while.   Uke music sounds cool, and you can find chords to almost any song transcribed for ukes on the innerwebs.  I liked the sound so much I made my junker guitar into a big ukulele - changing my six string into a four string.  (Which interestingly enough, I found out that some of the original Blues players way back in the 1920's used to play four string guitars that they made themselves!)

WP_20180111_20_07_13_Pro.JPG

* Stair Railing

I made this stair railing about 1988.  All from scratch, only raw lumber, no pre-made balusters or railings.  I modeled it after the one at my Grandparent's farm in Elo Michigan.  I always loved that it had a flat post top, because you could always set things on top of it that had to go upstairs.  A small convenience, to be sure, but it worked!   ( "Form Follows Function,"  the elements of good Modernist design).

WP_20180111_20_10_06_Pro.JPG
WP_20180111_20_09_48_Pro.JPG

* Shaker Style End Tables

I love the simplicity of Shaker style furniture.  I made these two tables for my sisters around 1986 for Christmas.  Modeled by my lovely niece Sarah.

WP_20180111_20_13_34_Pro.JPG

* Bookshelves

Bookshelves made for my son's room in 1986.  Simple design, made for ease of moving them around and stability.  They easily bolt to the wall and to each other.  (Safety first).   Individual units are 29 inches wide and 72 inches high, and 10 inches deep.  Made from stock lumber.  I've made about 15 of these units, six in my library, and a few others scattered around the house, and a few that I sold.

The second photo is of the same type bookshelves in my library.  Three more sections not pictured.  

WP_20180111_20_11_39_Pro.JPG
WP_20180128_12_38_16_Pro.JPG

* 1969 RV Trailer

When I retired from the USPS I needed a project to work on.  In July 2011 I found this trailer on Craigs list.  The guy wanted $1300.  I told him the only good parts of it were the roof and tires.  He was a realist, so I talked him down to $500.  I put it up on cinder blocks in my backyard and spent the next year working on it. (Not much in the winter).

It needed pretty much everything.  Ants had eaten out one whole corner under the aluminum, there was dry rot, bugs, dented aluminum, structural problems, rusted frame problems, roof vent problems, window frame and glass problems, floor and wall problems, insulation problems, door problems, holes in the undercarriage where the bugs got in. --- everything on it needed some kind of work. Like I told the guy, the only solid things about it was the roof and the tires.  (Though I spent a lot of time recoating and prettyfying the roof).

I made a four page list of things it needed and checked them off as I went along.  I kept a log of all the work I did on it, that was about 40 pages long.  Here's just a part of the check off - to do - list:

Take off running lights and seal holes -- make mounts for taillights -- insulate and seal corners -- see if it all leaks in a rainstorm -- coat roof -- patch all side holes -- wire brush frame -- paint frame --  seal back door and repair -- fix window mechanisms and make handles -- paint exterior -- trim out all corners -- build seat/bed frames -- paint interior -- make rain awnings for the windows and doors (I used the metal from the sides of an above ground pool for those) -- repair the "under edges" of the whole trailer -- put down a new wood floor and put vinyl over that, trim it out -- Take off most of the inside walls and repair the structure and re-insulate-- repair the front door and remove three of the small door windows so only two are left -- rewire the whole running light system -- take off the inner covers over the wheel wells and build new ones -- take off the magnetic trailer brakes (by law it was a light enough trailer so that it didn't need trailer brakes, I took them off and threw them away, though I did keep the powerful 12 volt electric magnets- might be useful for something) -- make a heavy duty step to get into the trailer -- install a new roof vent and repair that whole area -- caulk the wheel wells -- put aluminum patch on the holes under the trailer -- repair the frame where the hitch system attaches to the frame -- Make a small removable table with a checker board on it -- make and install new aluminum trim on all the outside corners -- take out the small sink and make it into a kitchen top -- get a small hotplate, and hook up interior electrics and electrical outlets -- make an outside plug system to hook up to the interior electrics-- put glass in two of the windows -- make screens for the windows-- reuse the mahogany trim from the sink area to prettyfy the small checkerboard table edges and the edges of the new kitchen area --  make curtains for all windows -- weather strip the door --put up interior shaker peg hooks that I made -- put up shelving that I made-- decorate with old license plates from motor homes and my old motorcycle plates -- fix the ceiling and trim it out -- install new door lock -- make winter covers for the windows that are easily installed and removed --

And believe it or not, that's only about half the list.  When all was said and done my final cost to repair it was only $1700, not counting the $500 prchase price.  The last couple of pictures show it up on my 35 acres in the Elo valley in the U.P. of Michigan.  I kept it up there for a few years for fishing trips with friends but eventually sold it for a nice profit.  I hated to see it slowly deteriorate in the UP's harsh winters.

WP_20180113_12_32_58_Pro.JPG
WP_20180113_12_27_28_Pro.JPG
WP_20180113_12_28_22_Pro.JPG
WP_20180113_12_28_47_Pro.JPG
WP_20180113_12_29_11_Pro.JPG
WP_20180113_12_29_34_Pro.JPG
WP_20180113_12_30_26_Pro.JPG
WP_20180113_12_30_44_Pro.JPG
WP_20180113_12_31_10_Pro.JPG
WP_20180113_12_31_34_Pro.JPG
WP_20180113_12_31_51_Pro.JPG
WP_20180113_12_30_00_Pro.JPG
P1060369.JPG
P1060370.JPG
P1060371.JPG
P1060373.JPG
P1060372.JPG
P1060374.JPG
WP_20180113_12_32_08_Pro.JPG
WP_20180113_12_32_30_Pro.JPG
WP_20180113_12_33_19_Pro.JPG

1879 Antique Clock

23 inches high,  Oak kitchen clock,  shelf made by my son Jeff Maki in 7th grade.

This is my Grandparent's kitchen clock from their farm in Elo Michigan.  This clock has always been in my life.  Even as a little kid I loved listening to its tick-tock and chime.  It's been in my family probably from around 1907 to now.  I'm sure they didn't bring it with them from Finland in 1905,  when my Grandfather was seven years old, but must have acquired it shortly after.  It has an 1879 date on it.  I inherited it in the late 1970's and have kept it running since.  Until the 1990's or so the original mechanism was still in it, I would clean and oil it every few years.  Finally the pivot bushings were so worn out that the gears would lock up.  So I replaced the mech with a new one which lasted about 20 years.  Finally it got so hard to find a good  windup mechanism for it that I put a battery operated pendulum "meckagism" in it keeping all the other parts (clock face, hands and pendulum) original.  It keeps perfect time.  I kept the original mechanism, it could be restored but it would take a long time and a lot of work to fix it.

This is just one of many old clocks that I've repaired and restored - this is the only one that had a totally worn out mech.  It's still our main clock, keeping time in our kitchen.


WP_20180123_15_59_46_Pro.JPG

* 1977 Dodge Van

This is the third van that I owned and the first brand new vehicle that I ever bought.  A 1977 Dodge Ram Wagon 1500 with a 318 V8 engine.  I bought it without any interior except the seats .  I paneled it and carpeted it and built storage for a cooler and tools and stuff along the far wall.  In the back it had a bed platform about 14 inches off the floor with storage under that.  The bed had the matching carpet on it and 3 inches of foam padding. Very comfortable to sleep in.  I also put a 24 x14 inch glass roof vent in it.  I remember that when I was on the roof cutting a big hole in it for the roof vent my sister in law came by and said, "What in the world are you doing to that brand new van!?" 

My wife and I traveled all over the country in that van over the years.  I think we were in 43 or more states with it.  I kept it running for 22 years and 200,000 miles.  I also painted the wheels and bumpers to match the interior.  

The trip pics included here are from the California coast and the Pacific Ocean (Me leaning on the truck). Kaye and the van on the Florida Keys (I remember that our son Jeff was 1 or 2 years old and sleeping in the back of the van when this pic was taken).  The next pic is of Kaye somewhere in Arizona. Notice my front plate in this pic -- "So Wot" it said -- for some reason that was my motto back then.  The last pic is Kaye and I somewhere in Nevada I believe.

WP_20180131_16_07_15_Pro.JPG
WP_20180131_16_07_41_Pro.JPG
WP_20180131_16_06_17_Pro.JPG
WP_20180207_18_08_07_Pro.JPG
WP_20180207_18_12_40_Pro.JPG
WP_20180207_18_07_25_Pro.JPG
WP_20180207_18_05_41_Pro.JPG

* 1965 Volkswagon Microbus

This is the second van that I owned.  I think I bought it about 1973 for $100.  It didn't have any interior, and it had three engines -- all in parts -- and all inside the van.  Nothing in the engine compartment.  A friend and I spent a few months cobbling together one engine from the three.  It ran great, but those vans were underpowered.  I drove it for quite a few years.  

Around 1975 I took it on a trip up to Black Lake Michigan  to go camping with some friends and the engine stopped running on I-75 just south of Gaylord.  My buddies were already up there so I was driving by myself.  I knew it was something serious so I left it on the side of the freeway and hitchhiked the last 50 miles.  I made it up to the campground in about 2 hours with 3 different rides and walking about a half mile.  It was a gorgeous summer day listening to the birds singing and walking on the backroads saying hi to the cows staring at me from the pastures.

My buddies and I then went to the hardware store, bought 10 feet of chain and 2 hooks to put on either end and went back to tow it into a rest area.  We left it there for two days then on the way back picked it up and towed it 300 miles back to Madison Heights where I was living at the time.  A friend and I took the motor out in his dirt driveway - it had no back bumper, so it was easy.  Open the engine compartment door, take off four engine mounting bolts, put a good jack under it, unhook the gas lines and electrics , and push the truck forward, and there you go ...the engine sitting on the jack in the driveway!

VW's are very easy to work on.  When we took it apart we found that the #3 cylinder had sucked a valve right into the top of the piston.  It was stuck right in the top of it, half in half out.  I took the piston to my Dad who worked building prototypes for Chrysler at that time and asked him if he could fix it. "No problem" he said.  Couple days later I got it back, the hole perfectly welded and my friend and I put it all back together, and reinstalled the engine in about an hour. I drove it with no further problems for a few more years.

WP_20180131_16_03_13_Pro.JPG
WP_20180202_15_47_05_Pro.JPG
WP_20180202_16_02_05_Pro.JPG

* Antique woodstove

I love old wood burning stoves.  I guess it comes from memories of my Grandparent's farms and their friend's farms up in the Upper Peninsula of Michigan. When I was a kid every farm up there had a wood kitchen stove even if they had a small gas stove too.  The ambiance of wood stoves is perfect -- the smell, the warmth, the sound of crackling wood.  This one is an old pot belly stove, I can't remember where I got it.  But it needed a fair amount of work.  I think this is the only pic I have of it.  It's in the first apartment my wife and I had.  We used it as decoration.  And I never did get to fire that one up. I sold it at some point.  I've had and restored about 6 or 7 different stoves.  There's just something about them I can't resist.


WP_20180131_15_59_38_Pro.JPG

* 1967 Triumph 500 Motorcycle

This was one of a dozen or so motorcycles that I have owned and worked on.  This one I bought from a friend and had it a few years.  English bikes had crappy engineering at the time.  Especially the carburetors and electric systems.  My friend made new intake manifolds for used Japanese carbs that he put on (Keihin carbs from a 450 Honda).  He threw the British Amal carbs in the trash where they belong!  It ran a hell of a lot better!  Also he rewired the electrics so the lights wouldn't dim when you're sitting idling at a light at night.  I helped him with parts of the restoration and eventually he sold it to me.  Mechanically it was a piece of crap. But it sure looked cool.  It used to throw oil all over you when you rode it. I was used to having very dependable and well running Hondas, Suzukis and Yamahas.  The 550 Super Sport Honda that I owned for many years was my best bike.  It was faster than my friend's 750 Hondas.  I even accidentally dumped a Honda in a river near Lake Michigan one time -- pulled it out -- took off the air cleaners and took out the plugs.  Kicked the engine over a few times and let all the water come out.  Put it back together, and on the second kick it started!  And ran great for years after!

WP_20180202_15_30_49_Pro.JPG
WP_20180131_16_02_21_Pro.JPG

* The Screaming Yellow Zonker

This was the first dirt bike that I owned.  A late 60's Suzuki 250.  My friends and I used to go up north a few times a year with our bikes and have a blast in the woods and trails and dirt roads.  Tons of memorable adventures.  This pic is actually from a gravel pit somewhere near Oxford Michigan. Two friends and I were riding on a Sunday through a working gravel pit.  There was a whole flat area of gravel slurry and mud that I had to be the first one through.  Bad mistake.  The mud turned into something more like wet cement.  My bike got stuck.  Just standing there in the mud by itself.  Three of us couldn't get it out. I was ready to open the fuel line and throw a match on it.  Seriously.  It was a $100 junker so was no big deal.  But it ran great. My friends talked me out of burning it.  It took hours to get it out!  We finally had to take the bike OFF its wheels and carry the frame to dry ground.  The whole time we are sinking into the mud ourselves.  We almost lost our boots until we found a 4 x 8 sheet of plywood to stand on.  Then we couldn't get the wheels out.  Three of us could not pull one wheel out.  We found a shovel nearby and dug them out.  Needed a few beers at the end of that day.  But left with a wonderful story.

The other pics are me with the Zonk.  The Zonk resting in my garage (note the duct tape on the seat).  The Zonker's other name was "The Tape and Wire Special,"  I got a kick out of keeping it running at no (zero) expense. I used a lot of duct tape and stainless steel lock wire.  In my younger days I was mostly broke. Things were taped and wired together, or repaired with junk parts.   Plus it had no kick starter.  I had to either park it on a hill to roll-start it, or have the other guys push-start me. 

The last pic is us taking a break in the woods to repair one of the other guy's bike.  Notice that the Zonker did not need repair!


WP_20180131_16_01_46_Pro.JPG
WP_20180202_15_56_46_Pro.JPG
WP_20180202_16_00_24_Pro.JPG
WP_20180202_15_56_59_Pro.JPG

* 1972 Triumph Spitfire

This was the only English sports car that I've ever owned, but my one dream car would be a late 1940's MG, British Racing Green, with the wire wheels.

I got this car with the engine rebuilt but not in the car.  And it needed other work too.  I do remember putting the engine in one summer day.  It was a small four-banger.  I think it only weighed 70 or 80 pounds.  I just picked it up by hand, stepped into the engine compartment, bent down and slid the engine onto the trans shaft. I couldn't believe how easy it went in.  It was a fun car to drive for a few years.  But like most English cars and motorcycles of that time the carbs were crap.   All in all it's another one I probably should have kept.

WP_20180131_15_57_45_Pro.JPG
WP_20180202_15_54_20_Pro.JPG
WP_20180202_15_54_32_Pro.JPG
WP_20180202_15_54_46_Pro.JPG
WP_20180203_09_31_31_Pro.JPG

* Old printing presses

This pic shows some of the printing equipment I used to be fascinated by.  That's me in the late 1970's with our dog Spats. The big machine in front is an older A.B.Dick Model 350 Offset Printing Press.  I learned to work it on my own mostly from a book.  The printing company I bought it from showed me the basics in about half an hour and the rest was up to me.  I had a small printing company The Pinetree Graphic Press and printed the postcards shown in the Drawings and Misc. section of this website.

Also in the background on the right is a very old cast iron paper cutter with a 25 inch razor sharp blade. It could cut through 5 inches of paper like it was butter.  Over the top of the offset press you can faintly see one of the small tabletop cast iron letterpress printing presses I owned and loved to restore.  I think I had 5 different letterpresses the biggest had a cast iron flywheel that was about 2 1/2 feet in diameter.  It was an antique Pearl press.  That was a fun project to restore.

The second pic is a 100 year old Pearl Letterpress, this wasn't mine but was quite similar.  (I don't have any pics of my letterpresses.) The third pic is a Kelsey tabletop press.  Pretty much exactly like the one I had.


WP_20180131_15_56_55_Pro.JPG
pearl.jpg
s-l400.jpg

Watercolor plein air kits

These are two watercolor plein air (painting outdoors) painting kits I put together, the first one I made by cutting an 8 1/2 by 11 watercolor sketchbook in half to make two 8 1/2 x 5 1/2 plein air sketchbooks.  The watercolor tin is made from an Altoids tin and the  paint holders (with no paint in them yet) are made from my son's legos! 

The second watercolor kit is made with a store bought paint box but I made it into a traveling plein air kit that everything fits into the small silver bag at the top.  Except for the sketchbook. Great for traveling light!

WP_20180129_11_01_22_Pro.JPG
WP_20180129_10_59_42_Pro.JPG

Handmade plein air kits

This is a plein air painting kit I made for acrylic or oil painting outdoors. It's made from a small teabox that I found for 2 bucks at a thrift shop. I made the clamp-on brush holder on the side from scratch and put the hardware on to hold the painting. I also added the removable strap for carrying or you can also use it to sit on a chair or rock or stump to paint with the strap around your waist and the box on your knees and it won't fall off!  I also added a 1/4-20 nut to the bottom that you can attach it to any photo tripod.  The whole thing, without paint, weighs less than 2 pounds.

WP_20180131_15_42_46_Pro.JPG
WP_20180131_15_43_26_Pro.JPG
WP_20180129_11_10_52_Pro.JPG

Another plein air kit

Another plein air set up.   Made from a thrift store box with a sliding top. I made that sliding top into the palette with removable paper sheets where I mix my paint.  Then I made the top lid from scratch so that when it's closed everything fits inside the box.  It also has a carrying strap that can be used to hold the box securely on your lap.

WP_20180131_15_45_55_Pro.JPG
WP_20180131_15_46_28_Pro.JPG
WP_20180131_15_47_50_Pro.JPG

2 more plein air boxes

The first box I made from an old silver- ware box and the second is a store bought tabletop box that I extensively altered so that it could be used outside.  I made both so they could be mounted on a tripod. I altered the store bought one to hold bigger canvases and to hold a palette on its back surface, which I made into the front surface.  A very versatile box but slightly heavy at about 5 pounds

WP_20180131_15_50_57_Pro.JPG
WP_20180131_15_55_07_Pro.JPG

* 1967 Chevy Van

This was my first van.  Bought it not running for $150 in about 1972 -- all it needed was some carb work and I had it fired right up in a few minutes after towing it home.  It had a 6 cylinder, three on the tree shifter and was a fun project.  The inside was completely bare with a crushed in roof.  I got my small hydraulic jack and a long 4x4 piece of wood and jacked the roof back into place.  A little bit of primer made the outside look good.  And inside I carpeted it and paneled it.  Drove it few years and sold it for a nice profit.

The last of the 3 photos is how it could look with a better paint job and cool wheels and tires.

WP_20180202_15_52_51_Pro.JPG
WP_20180202_15_46_45_Pro.JPG
4fbd9aa26e6792317c790b05444893b4.jpg

* 1976 Honda MR250

This was the best dirt bike I ever had. It could go through anything, and climb almost anything.  And it was fast.  I could beat all my buddies except Bill who had a 500 Yamaha TT.  The last picture is of Bill going through really deep water!  The other pics are of me in the mud and back at camp.  Pics probably taken up near Black Lake MI.  Really good trail riding up in that area.

WP_20180202_15_39_22_Pro.JPG
WP_20180202_15_37_20_Pro.JPG
WP_20180202_15_37_56_Pro.JPG
WP_20180202_15_40_25_Pro.JPG

* 1975 Honda 550 Supersport

This was my 550 Honda Supersport, I owned it in the late 70's, probably one of the finest road bikes that Honda ever designed.  Super fast, easy handling and great looks.  I changed it slightly by adding 2 inch fork extenders to the front fork so that it fit my riding style a little better.  Definitely the best road bike I ever owned.  (The Honda MR250 was the best dirt bike I ever owned).

I went on a lot of road trips all over Michigan on this bike.  The other three pictures are of me and three friends on a trip to the Lake Michigan shoreline.  We camped right on the beach for a couple days.  You certainly can't do that anymore!

  That's me in the middle in the pic of us standing on our bikes.  Left to right -  Larry's Harley Davidson Sportster -  my Honda 550 - Joe's 650 BSA -  and Willie's 500 Triumph that I eventually owned.  Both the Harley and the BSA had mechanical problems on this trip. (They almost  always did). But with four excellent mechanics here it was no problem at all.

The pic on the beach was taken in the morning.  We camped right there, and when we woke up in the morning our sleeping bags were almost in the water!  We forgot that Lake Michigan has tides just like the ocean.

WP_20180203_09_31_08_Pro.JPG
WP_20180203_09_29_28_Pro.JPG
WP_20180203_09_30_43_Pro.JPG
WP_20180202_15_54_08_Pro.JPG

* The Drowned Honda

This was the first bike I ever owned when I was probably 17 years old.  The two pics are of a friend and I on a trip to Lake Michigan.  This is the Honda that I accidentally dumped in a river and completely submerged on this trip.   I was riding on the sand at the rivers edge and decided to go a little into the water, which I thought was real shallow.  Bad mistake.  It wasn't.  It was a few feet deep.  Imagine my surprise being instantly dumped in the water.  The bike was completely under.  Kevin and I got it out real fast.  I took off the air cleaner and a quart or more of water came out of that.  I took the spark plugs out and kicked over the motor and some mist came out of that.  I put everything back together, kicked it over twice, and it started right up!  Never had a problem with it.  Hondas, gotta love 'em!

WP_20180202_15_50_20_Pro.JPG
WP_20180202_15_51_31_Pro.JPG

* 1971 Yamaha 360cc

This was a great all around bike.  Quick and nimble on the road and just the same in the dirt.  Also notice the shark teeth helmet!  Too cool! LOL

WP_20180202_15_47_20_Pro.JPG

Schematic Pages as Art

These pages are from some of the Maintenance Manuals for the various machines that I worked on at the Post Office.  In the classes that we had in Oklahoma the instructors would go over almost every page of the schematics.  I loved adding some color to them and "prettifying" them, as my son would say.  The color kept me awake in class and made it easier for me to follow the important info.  I've probably got thousands of pages like this.  They look like "art" to me!  It amazes me the amount of work a human can do if they set their mind to it, and actually DO IT!

WP_20180203_11_05_25_Pro.JPG
WP_20180203_11_03_52_Pro.JPG
WP_20180131_16_34_48_Pro.JPG
WP_20180131_16_37_42_Pro.JPG
WP_20180131_16_38_00_Pro.JPG
WP_20180128_20_51_42_Pro.JPG

DBCS Machine

This type of machine was my favorite to work on.  We had 60 of these at one time at The Metroplex, our hugh Distribution Center that handled the mail for almost all of Southeast Michigan. These pics show how big the DBCS actually was.  The fifth picture is a schematic of the layout of the rollers and belts inside the WABCR section (where the barcodes are read by the Wide Angle Barcode Reader).

WP_20180112_19_34_45_Pro.JPG
043-03076-04-30-03.jpg
WP_20180203_11_08_38_Pro.JPG
WP_20180203_11_14_47_Pro.JPG
WP_20180203_11_16_51_Pro.JPG
07010_040_01_24_2007.jpg
prev / next
Back to Craftsman Stuff and Cool Stuff---
1
Click here for intro to Cool Stuff...and a list of projects I've worked on
5
Guitar stand
36
*Cutting a canoe in half
16
*E. Sicardi, old mandolin restoration
7
4 string guitars
1
* Banjo, 1905 Lyon and Healy
9
*Homemade Resonator Guitar
4
*Goya guitar, repair
3
* Guitar, 1935 ? National Duolian
1
* Guitar, 1930's Oahu guitar
2
Instruments I've worked on
4
*Fender Strat and Gibson Les Paul
1
* Pool Deck and Surrounding Fence
1
Ukelele, Kay 1961
2
* Stair Railing
1
* Shaker Style End Tables
2
* Bookshelves
21
* 1969 RV Trailer
1
*1879 Antique Clock
7
* 1977 Dodge Van
3
* 1965 Volkswagon Microbus
1
* Antique woodstove
2
* 1967 Triumph 500 Motorcycle
4
* The Screaming Yellow Zonker
5
* 1972 Triumph Spitfire
3
* Old printing presses
2
Watercolor plein air kits, Hand made
3
Handmade plein air kits
3
Another plein air kit, hand made
2
2 more plein air boxes, hand made
3
* 1967 Chevy Van
4
* 1976 Honda MR250
4
* 1975 Honda 550 Supersport
2
* The Drowned Honda
1
* 1971 Yamaha 360cc
6
Schematic Pages as Art
6
DBCS Machine

GO BACK TO MENU

Check out the art in the other categories!